Studio monitor DIY with flat frequency response for audio mixing and recording
Studio monitors determine the quality of an audio mix. Most studio monitors are designed for flat frequency response. I am going to give you some specifications for building your own studio monitor with flat frequency response.
At times, while setting up a home studio, we may not like to spend much for these monitors. In such cases, i would recommend DIY ing. You however need to pick an amplifer seperately for this studio monitor.
1. Woofer and high frequency driver selection
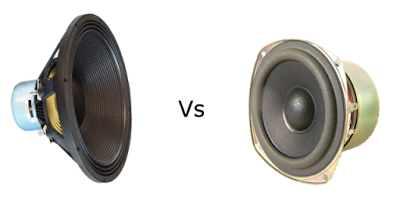
At first, woofer selection is to be done wisely. It is always better to stay with 5 or 6.5 inch drivers for monitors. A monitor with 8 inch driver may sometimes sound a bit boomy.
Choose a driver with medium excursion capabilites. Too much of excursion or too small excursion will not suit for studio monitors.
If you have difficulty finding the right xmax, there is one more clue. Choose driver with 0.75-1 inch diameter voice coils. They usually have a power handling of 30-60 watts rms. Also, dont go for paper cones. Instead, go for stiff cones with no rough surfaces.
For high frequency drivers, its better to stay with dome tweeters, just like most of high end monitors have. It is better to have a driver that can be crossed over at or above 3000Hz.
2. Enclosure design
The next step is enclosure size. This determines the frequency response of the monitor. I have given here some dimensions for a perfectly flat frequency response. You, dont need to calculate any T/S parameters.
For 5.25 inch driver the internal box dimensions are 5.5 x 6.5 x 9 inches (width x depth x height). You may have to add some volume to the box, based on the size of the magnet.
For 6.5 inch driver the internal box dimensions are 7 x 6 x 10 inches (width x depth x height). You may have to add some volume to the box, based on the size of the magnet.
If you would like to use any other driver size, please see Magic enclosure volumes
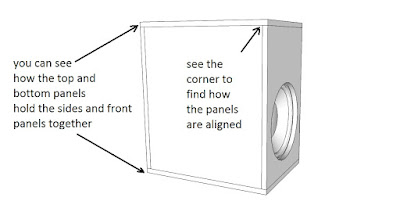
You may assemble the cut panels as per the below diagram, or you may follow your own way of planning, cutting and assembling the panels. Just remember to keep the internal dimensions as close as possible to the above specifications.
Also, the front panel edges may be rounded off.
3. Port tuning.
Port tuning has to be done with more precaution. It is always better to keep the ports at the back. You may use any of the online port tuning applications to tune your port.
For a 5 inch woofer, it is better to tune the port around 45-50 Hz. If you feel that your woofer can go very low, then tune at 45 Hz else tune it to 50Hz (may be 47 Hz also is good).
For a 6.5 inch woofer, the port tuning frequencies are 33-37 Hz. If you feel that your woofer can go very low, then tune at 33 Hz else tune it to 37Hz (may be 35Hz also is good). You may have to use bends, if fitting a straight port of appropriate size is not possible. You may also prefer a sealed enclosure for 6.5 inch driver enclosure.
Frequency response
This design sounds good for any driver. Still, you may find some peaks around 300Hz (not audible though) and at woofer-tweeter crossover frequency. Otherwise the frequency response is flat. You can expect a more realistic sound with accurate mid and deep bass.
If you get to have any difficulties in the above design please comment below.
At times, while setting up a home studio, we may not like to spend much for these monitors. In such cases, i would recommend DIY ing. You however need to pick an amplifer seperately for this studio monitor.
1. Woofer and high frequency driver selection
At first, woofer selection is to be done wisely. It is always better to stay with 5 or 6.5 inch drivers for monitors. A monitor with 8 inch driver may sometimes sound a bit boomy.
Choose a driver with medium excursion capabilites. Too much of excursion or too small excursion will not suit for studio monitors.
If you have difficulty finding the right xmax, there is one more clue. Choose driver with 0.75-1 inch diameter voice coils. They usually have a power handling of 30-60 watts rms. Also, dont go for paper cones. Instead, go for stiff cones with no rough surfaces.
For high frequency drivers, its better to stay with dome tweeters, just like most of high end monitors have. It is better to have a driver that can be crossed over at or above 3000Hz.
2. Enclosure design
The next step is enclosure size. This determines the frequency response of the monitor. I have given here some dimensions for a perfectly flat frequency response. You, dont need to calculate any T/S parameters.
For 5.25 inch driver the internal box dimensions are 5.5 x 6.5 x 9 inches (width x depth x height). You may have to add some volume to the box, based on the size of the magnet.
For 6.5 inch driver the internal box dimensions are 7 x 6 x 10 inches (width x depth x height). You may have to add some volume to the box, based on the size of the magnet.
If you would like to use any other driver size, please see Magic enclosure volumes
You may assemble the cut panels as per the below diagram, or you may follow your own way of planning, cutting and assembling the panels. Just remember to keep the internal dimensions as close as possible to the above specifications.
Also, the front panel edges may be rounded off.

3. Port tuning.
Port tuning has to be done with more precaution. It is always better to keep the ports at the back. You may use any of the online port tuning applications to tune your port.
For a 5 inch woofer, it is better to tune the port around 45-50 Hz. If you feel that your woofer can go very low, then tune at 45 Hz else tune it to 50Hz (may be 47 Hz also is good).
For a 6.5 inch woofer, the port tuning frequencies are 33-37 Hz. If you feel that your woofer can go very low, then tune at 33 Hz else tune it to 37Hz (may be 35Hz also is good). You may have to use bends, if fitting a straight port of appropriate size is not possible. You may also prefer a sealed enclosure for 6.5 inch driver enclosure.
Frequency response
This design sounds good for any driver. Still, you may find some peaks around 300Hz (not audible though) and at woofer-tweeter crossover frequency. Otherwise the frequency response is flat. You can expect a more realistic sound with accurate mid and deep bass.
If you get to have any difficulties in the above design please comment below.

Comments
Post a Comment